DTF Printer Setup Guide: Everything You Need to Know
Direct-to-Film (DTF) printing has quickly become one of the most powerful technologies in the custom apparel and textile decoration industry. Whether you are starting a home-based printing business, expanding a garment shop, or looking for a more flexible alternative to screen printing and DTG, DTF printers offer unmatched versatility, vibrant color output, and compatibility with nearly every fabric type.
However, your success with DTF printing does not begin when you press the first transfer—it starts the moment you unbox your printer. Understanding what comes inside the box, how each component works, and how to set up your machine correctly can save time, prevent costly mistakes, and help you achieve professional-quality results from day one.
This comprehensive guide will walk you through everything you need to know about a DTF printer: what it is, what to expect in the box, how to set it up properly, common mistakes to avoid, maintenance best practices, and how to get the most value from your investment. By the end, you will have a clear roadmap for starting your DTF printing journey with confidence and efficiency.
What Is a DTF Printer?
A DTF printer is a specialized inkjet printer designed to print full-color graphics onto a coated PET film rather than directly onto fabric. Once printed, the design is dusted with adhesive powder, cured using heat, and then transferred onto garments or other materials using a heat press.
Unlike traditional printing methods, DTF does not require pre-treatment, screens, or complex color separation. It supports full-color designs, fine gradients, and photographic details while working seamlessly on light and dark fabrics alike.
How DTF Printing Works
The DTF process typically follows these steps:
Design Creation – Artwork is prepared using graphic design software and processed through RIP software for color accuracy and white ink control.
Printing on Film – The design is printed in reverse onto DTF PET film using CMYK and white inks.
Applying Adhesive Powder – A special heat-activated powder is applied to the wet ink layer.
Curing the Design – The powdered film is heated to melt and bond the adhesive.
Heat Transfer – The cured design is pressed onto fabric using a heat press.
Peeling and Finishing – The film is peeled away, leaving behind a durable, flexible print.
This workflow allows decorators to create professional-grade apparel with minimal setup time and waste.
Why DTF Printing Is Growing So Fast
DTF printing has rapidly gained popularity because it bridges the gap between quality, flexibility, and affordability. Compared to other garment decoration methods, DTF offers several unique advantages:
Works on Nearly All Fabrics – Cotton, polyester, blends, nylon, leather, denim, and more.
No Fabric Pre-Treatment Required – Unlike DTG, saving time and money.
High Color Vibrancy and Detail – White ink underbase ensures excellent results on dark garments.
Low Startup Costs Compared to Screen Printing – No screens, emulsions, or washout stations.
On-Demand Printing – Ideal for short runs, customization, and one-off designs.
Because of these benefits, DTF printers are now widely used by print shops, fashion brands, promotional product companies, and home entrepreneurs alike.
What Comes in the Box: A Complete DTF Printer Unboxing Guide
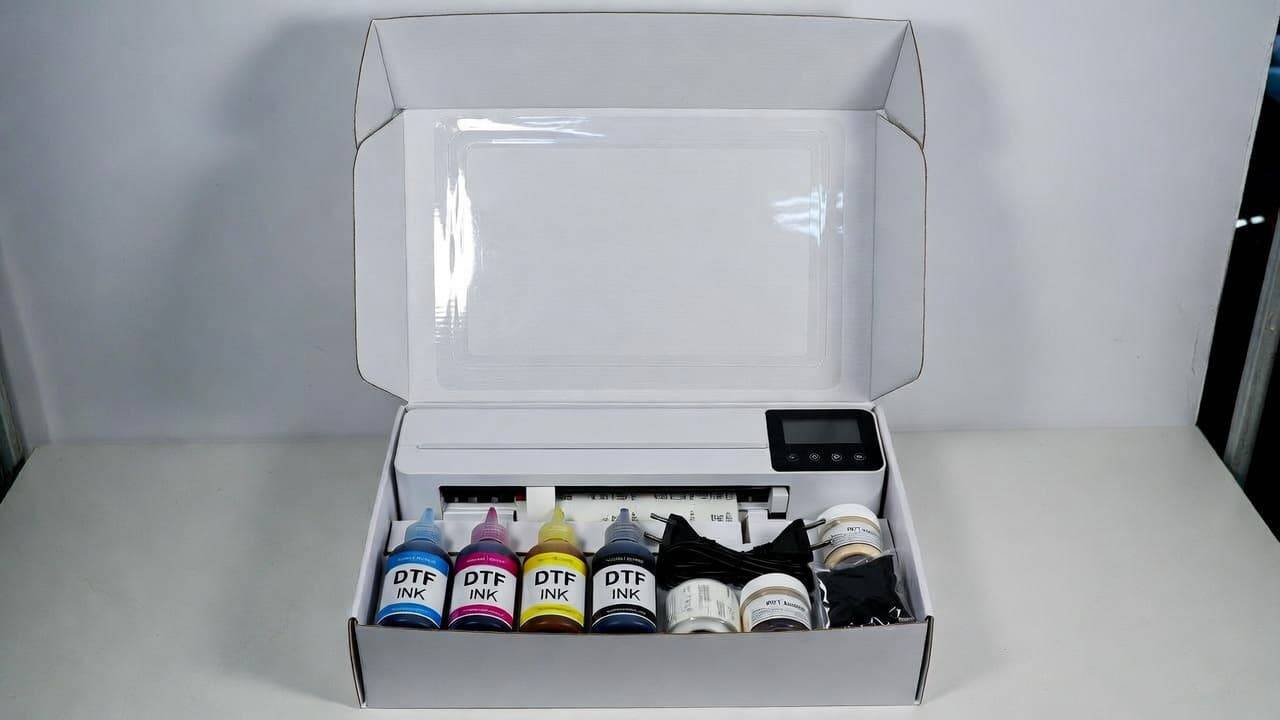
When your DTF printer arrives, it is important to verify that all essential components are included and in good condition. Missing or damaged parts can delay setup and affect print quality. Below is a detailed breakdown of what you can typically expect in a standard DTF printer package.
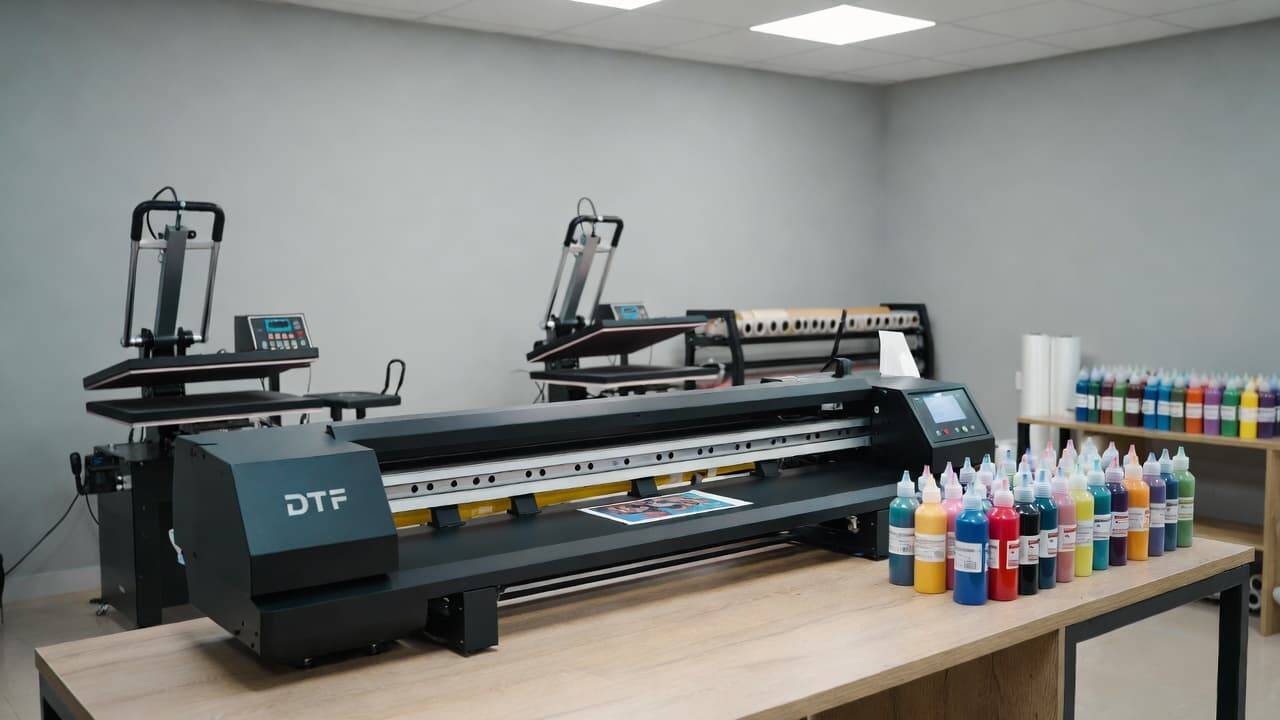
1. DTF Printer Unit
The main printer unit is the most critical item in the box. Most DTF printers are modified inkjet printers or purpose-built DTF machines equipped with specialized ink delivery systems for white ink circulation.
What to check:
No visible damage to the casing or internal components
Printhead area securely protected with shipping brackets or foam
All cables and ports intact
Always remove protective tape, brackets, and packaging materials carefully before powering on the machine.
2. Power Cable and Power Adapter
Your printer will include a compatible power cable and adapter suitable for your region’s voltage standards.
Important tips:
Verify voltage requirements (110V or 220V depending on your location)
Avoid plugging the printer into unstable power sources
Use a voltage stabilizer or UPS if power fluctuations are common
Stable power supply is essential to protect the printer’s electronics and printhead.
3. DTF Ink Set (CMYK + White Ink)
DTF printing relies on a specialized pigment ink set that includes:
Cyan
Magenta
Yellow
Black
White
White ink is the defining feature of DTF printing, allowing designs to pop on dark or colored fabrics. Many printers ship with starter ink bottles or cartridges to help you begin immediately.
What to check:
All ink bottles are sealed and labeled correctly
Expiry dates and storage instructions
Compatibility with your printer model
Always use manufacturer-recommended inks to avoid clogging and warranty issues.
4. DTF PET Film Rolls or Sheets
DTF film is a coated transparent or matte PET film designed to hold ink and adhesive powder before transfer. Most printers include sample film to test prints during setup.
Film types you may receive:
Cold peel film
Hot peel film
Instant peel film
Each type affects workflow speed and finishing texture, so understanding your film’s peel type is essential.
5. Adhesive Powder
Adhesive powder bonds the ink layer to fabric during heat pressing. This powder melts when heated and forms a durable adhesive layer.
Common powder grades include:
Fine powder (for detailed designs and soft finishes)
Medium powder (general-purpose printing)
Coarse powder (thicker fabrics and heavy garments)
Most starter kits include a small container of general-purpose adhesive powder.
6. Instruction Manual and Quick Start Guide
A printed or digital manual is usually included, covering:
Unpacking instructions
Ink loading procedures
Film loading steps
Basic printer operation
Maintenance guidelines
Troubleshooting tips
Even experienced print professionals should review the manual carefully, as DTF printers vary by brand and model.
7. Cleaning and Maintenance Kit
Proper maintenance is crucial for DTF printing, especially because white ink can settle and clog printheads if not managed correctly.
A typical cleaning kit may include:
Cleaning solution
Syringes for ink line flushing
Cleaning swabs or lint-free wipes
Gloves
These tools help keep the ink system flowing smoothly and extend the life of your printer.
8. RIP Software or Installation Media
DTF printers rely on RIP (Raster Image Processor) software to manage color profiles, white ink layers, ink density, and print resolution. Some printers include:
Installation CDs or USB drives
Download links and license keys
User guides for software setup
Popular RIP software options include Acrorip, EKPrint, Kothari RIP, and other brand-specific solutions.
9. Sample Print Files or Test Patterns
Many manufacturers include sample designs or test files so you can verify print quality, color accuracy, and white ink performance immediately after setup.
These files help ensure:
Ink channels are working correctly
No banding or nozzle clogging exists
White ink underbase is printing evenly
10. Warranty Card and Support Documentation
Warranty coverage protects your investment and ensures access to technical support if issues arise.
Always check:
Warranty duration and coverage terms
Printhead warranty conditions
Support contact details
Return or replacement policies
Registering your printer shortly after purchase is recommended for faster support services.
Step-by-Step DTF Printer Setup Process
Once you have confirmed that all components are present, it’s time to set up your DTF printer. Proper installation ensures smooth performance, optimal print quality, and fewer technical issues down the line.
Step 1: Choose the Right Location
Place your printer in a clean, dust-free, and well-ventilated environment. DTF printing involves inks, adhesive powders, and heat curing, so workspace conditions matter.
Ideal setup conditions:
Stable, vibration-free surface
Room temperature between 20–28°C (68–82°F)
Moderate humidity (40–60%)
Good airflow, especially near curing areas
Avoid placing the printer near direct sunlight, heaters, or open windows.
Step 2: Unpack and Inspect the Printer
Remove all shipping materials, protective films, foam inserts, and locking brackets from the printer. Carefully follow the unboxing instructions in the manual.
Check:
Printhead carriage movement
Ink tube connections
Damper and capping station placement
Never force moving parts manually unless instructed by the manufacturer.
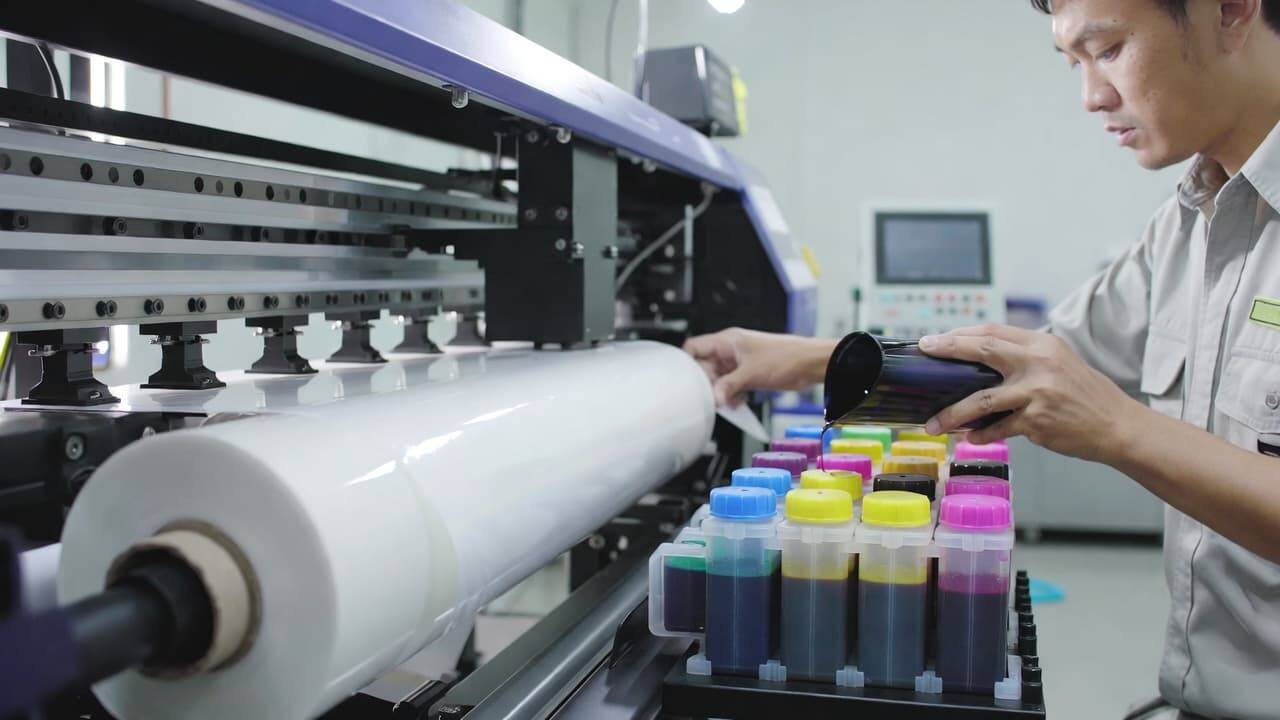
Step 3: Install the Ink System
Fill ink tanks or cartridges according to the color labels. White ink should always be shaken gently before installation to prevent pigment settling.
Important best practices:
Wear gloves to avoid ink stains
Do not mix ink brands or types
Ensure ink lines are properly primed
Once installed, run initial ink charging cycles using the printer’s control panel or RIP software.
Step 4: Load the DTF Film
Insert the PET film roll or sheets into the film feeder with the coated side facing the correct direction (usually matte side up, but confirm with the manufacturer).
Ensure:
Film feeds straight without wrinkles
Tension is even
No curling or bending occurs at the print path
Improper film alignment can cause head strikes or print distortion.
Step 5: Install RIP Software and Drivers
Install the printer driver and RIP software on your computer. Follow on-screen instructions carefully and connect the printer via USB, Ethernet, or Wi-Fi as supported.
After installation:
Import ICC color profiles
Set print resolution and ink limits
Enable white ink layer printing
This step ensures accurate color reproduction and consistent output quality.
Step 6: Perform Nozzle Check and Test Prints
Run a nozzle check pattern to confirm all ink channels are flowing correctly. You should see solid, uninterrupted lines for CMYK and white ink.
If gaps appear:
Run a light cleaning cycle
Repeat nozzle check
Avoid excessive cleaning, which wastes ink
Once the nozzle check passes, print a test design to evaluate color vibrancy, white ink coverage, and detail sharpness.
Step 7: Apply Adhesive Powder and Cure
Sprinkle adhesive powder evenly over the wet ink layer. Shake off excess powder before curing.
Cure the design using:
A heat press hover mode
Conveyor dryer
Curing oven
Recommended curing temperatures usually range between 110–130°C (230–266°F) for 2–5 minutes, depending on powder type and film thickness.
Step 8: Transfer the Design onto Fabric
Position the cured film onto the garment and heat press according to powder specifications (typically 140–160°C / 285–320°F for 10–15 seconds).
Peel the film (hot, cold, or instant depending on film type) and optionally apply a second press using parchment paper or Teflon for improved durability and finish.
Common Beginner Mistakes to Avoid
Many first-time DTF users experience preventable issues during setup and early production. Avoiding these mistakes will save time, money, and frustration.
1. Skipping Daily White Ink Circulation
White ink settles quickly. Failing to circulate or shake white ink daily can lead to clogged dampers and printheads.
2. Using Low-Quality Film or Powder
Cheap consumables often result in poor adhesion, cracking, and color dullness. Always use tested, compatible materials.
3. Incorrect Film Orientation
Printing on the wrong side of the film causes ink bleeding and transfer failure.
4. Overcuring or Undercuring Adhesive
Improper curing leads to peeling, cracking, or stiff prints. Always follow powder manufacturer guidelines.
5. Excessive Cleaning Cycles
Over-cleaning wastes ink and can shorten printhead lifespan. Use light cleaning unless severe clogging occurs.
Essential Maintenance Tips for Long-Term Performance
A DTF printer is an investment, and proper maintenance ensures consistent print quality and extended equipment lifespan.
Daily Maintenance
Perform white ink circulation or agitation
Run a nozzle check before printing
Wipe printhead bottom gently if necessary
Keep the printer covered when not in use
Weekly Maintenance
Clean capping station and wiper blade
Inspect ink lines and dampers
Shake white ink bottles or tanks
Monthly Maintenance
Flush ink system if printer is idle
Inspect encoder strip and rails
Check firmware and RIP software updates
Consistent maintenance significantly reduces downtime and repair costs.
DTF Printing vs Other Garment Decoration Methods
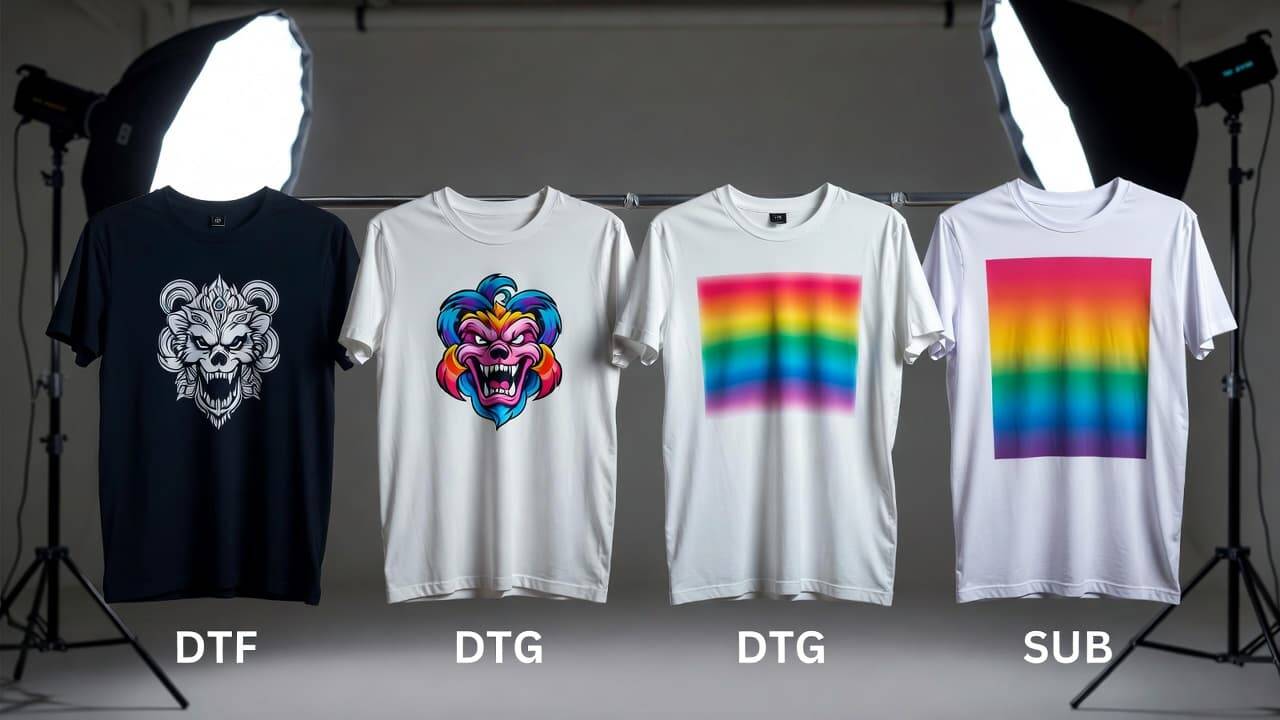
Understanding how DTF compares to alternative technologies helps businesses choose the right production method.
DTF vs Screen Printing
Screen Printing Pros:
Excellent for large volume runs
Extremely durable prints
DTF Advantages:
No screens or setup time
Cost-effective for small batches
Full-color printing without color separation
DTF vs DTG (Direct-to-Garment)
DTG Pros:
Soft hand feel
Ideal for cotton garments
DTF Advantages:
No pre-treatment required
Works on dark and synthetic fabrics
Better durability on blends and polyester
DTF vs Sublimation
Sublimation Pros:
Dye becomes part of fabric
No cracking or peeling
DTF Advantages:
Works on dark fabrics
Compatible with cotton and blends
No polyester coating required
DTF stands out as the most versatile option across garment types, colors, and production volumes.
Choosing the Right DTF Printer for Your Business
Not all DTF printers are created equal. Selecting the right model depends on your production goals, budget, and technical expertise.
Key Factors to Consider
1. Print Size and Width
Entry-level printers often support A3 or A4 sizes, while industrial models can handle 24-inch or wider films.
2. Print Speed and Resolution
Higher-end machines offer faster output and smoother gradients, ideal for commercial production.
3. White Ink Circulation System
Look for printers with automatic white ink stirring or circulation to prevent clogging.
4. RIP Software Compatibility
Ensure your printer supports reliable RIP software with strong white ink and color management tools.
5. After-Sales Support and Warranty
Reliable technical support and easy access to spare parts are essential for uninterrupted operations.
Cost Breakdown of DTF Printing
Understanding operating costs helps determine profitability and pricing strategies.
Initial Investment
DTF Printer: Entry-level to industrial pricing
Heat Press or Curing Unit
RIP Software License
Starter Consumables
Ongoing Costs
Ink refills
PET film
Adhesive powder
Maintenance supplies
Electricity and labor
Despite these expenses, DTF printing typically offers lower per-print costs compared to DTG and short-run screen printing, making it ideal for custom apparel businesses.
Print Quality Optimization Tips
To achieve professional-level results consistently, consider the following optimization techniques:
Use high-resolution artwork (300 DPI where possible)
Apply proper color profiles and ICC settings
Adjust white ink density based on garment color
Use fine adhesive powder for small text and detailed designs
Apply a finishing press for improved durability and texture
These small adjustments can dramatically enhance the look and feel of your final prints.
Environmental Impact and Sustainability Considerations
DTF printing is often considered more environmentally friendly than traditional garment decoration methods due to:
Reduced water usage compared to screen printing
On-demand production minimizing waste
Water-based pigment inks available from many suppliers
Using eco-certified inks, recyclable film packaging, and responsible disposal methods further reduces environmental impact.
Troubleshooting Common DTF Printing Problems
Even with proper setup, occasional issues may arise. Here are common problems and solutions:
Problem: White Ink Not Printing
Possible causes:
Clogged printhead
Air bubbles in ink lines
White ink disabled in RIP settings
Solutions:
Run nozzle cleaning
Prime dampers
Check RIP layer configuration
Problem: Design Peeling After Washing
Possible causes:
Insufficient curing
Low-quality adhesive powder
Incorrect heat press temperature
Solutions:
Increase curing time
Use higher-quality powder
Verify pressing parameters
Problem: Colors Appear Dull
Possible causes:
Low ink density
Incorrect ICC profile
Inadequate white underbase
Solutions:
Adjust ink limits
Load proper color profile
Increase white ink coverage
Problem: Ink Smudging on Film
Possible causes:
Excess humidity
Slow drying time
Film contamination
Solutions:
Improve ventilation
Reduce ink load
Use clean, high-quality film
Scaling Your Business with DTF Printing
Once you have mastered the basics, DTF printing opens the door to numerous business opportunities:
Custom t-shirts and hoodies
Sportswear and team uniforms
Corporate branding and promotional apparel
Tote bags, caps, and accessories
Small-batch fashion collections
Because DTF supports fast turnaround and low minimum order quantities, it is ideal for online stores, drop-shipping models, and print-on-demand services.
Best Practices for Workflow Efficiency
To maximize productivity and minimize errors:
Batch designs by film size and color density
Maintain a consistent curing and pressing routine
Label powders and films clearly
Schedule daily maintenance checks
Track consumable usage and reorder proactively
A streamlined workflow ensures faster delivery times and consistent customer satisfaction.
Long-Term Care and Storage Tips
If your printer will be unused for extended periods:
Flush ink system with cleaning solution
Remove and store printheads if manufacturer allows
Seal ink bottles tightly
Store consumables in cool, dry conditions
Proper storage prevents clogging, ink separation, and component damage.
Frequently Asked Questions (FAQ)
What types of businesses benefit most from DTF printing?
DTF printing is ideal for custom apparel shops, promotional product companies, fashion startups, sportswear suppliers, and home-based entrepreneurs due to its flexibility, low setup cost, and full-color capability.
How often should a DTF printer be cleaned?
Basic maintenance should be performed daily, with deeper cleaning weekly or monthly depending on usage frequency. Regular white ink circulation is especially important to prevent clogging.
Can I print on any fabric using a DTF printer?
DTF works well on cotton, polyester, blends, nylon, denim, leather, and more. It is one of the most fabric-compatible garment decoration methods available today.
How durable are DTF prints?
With proper curing and pressing, DTF prints can last 50–100 washes or more without cracking, peeling, or fading, making them suitable for commercial apparel production.
Is DTF printing environmentally friendly?
DTF printing typically uses less water and produces less waste than screen printing. When paired with water-based inks and responsible material sourcing, it can be a more sustainable option.
Do I need professional experience to use a DTF printer?
No. While technical knowledge helps, most DTF printers are user-friendly and suitable for beginners. With proper setup and maintenance, new users can achieve professional results quickly.
Conclusion
DTF printing has transformed the custom apparel industry by offering unmatched versatility, vibrant color output, and compatibility with nearly every fabric type. From small startups to established print shops, businesses around the world are adopting DTF technology to meet growing demand for fast, high-quality, and personalized garment decoration.explore our high-quality DTF printers here.
Your journey begins with unboxing and setting up your printer correctly. Understanding every component inside the box, following best-practice installation procedures, and maintaining your equipment properly ensures consistent performance and long-term success. By mastering your workflow, optimizing print settings, and using quality consumables, you can unlock the full potential of DTF printing and scale your business with confidence.
Whether you are launching a new venture or upgrading your production capabilities, a well-set-up DTF printer is not just a machine—it is a powerful creative and commercial tool that opens doors to endless customization possibilities.